Saturday, December 25, 2010

Green Bean Casserole


1 (16 oz) package frozen whole green beans, thawed
4 slices bacon, fried
1/2 med onion, chopped
1/2 red bell pepper, sedded and diced
1/4c dry white wine or vermouth
1/4c milk
2 Tbsp butter
1 can Campbells cream of mushroom soup
1 Tbsp soy sauce
salt and pepper to taste
1/2c mozzarella cheese, shredded
1/2c canned French fried onions

Preheat the oven to 325˚F. Fry up the bacon until crisp. Drain on paper towel. Crumble bacon and set aside. Drain most of the bacon grease from the pan. Over medium heat, saute onions and bell pepper until tender. Stir in the wine, scraping all of the bits of bacon from the bottom of the pan. Mix in butter, milk, soup, and soy sauce. Season with salt and pepper. Stir in green beans and bacon. Fold in the cheese and transfer to a casserole dish. Sprinkle with French fried onions. Bake uncovered for 25 minutes.

Christmas Ham


I was talking to my mom today and realized that there is an evolution of sorts that takes place in families over time. For example, my sisters and I all wash our dishes as soon as dinner is finished. My husband and brothers-in-law don't understand why the dishes can't wait five or ten minutes. We don't know why. It's just the way our mother has always done things. It's just what seems right to us.

Another good example is our family's Christmas ham. My mother was always taught to cut the top off her ham. One day, my mother asked her mother (my grandmother) why she needed to cut the top off the Christmas ham. My grandmother said, "I'm not sure. It's the way my mother always did it." So my grandmother called her mother and asked. Grandma Heath said, "I'm not sure. It's the way my mother always did it." Grandma Heath asked Grandma Staley (my great-great grandmother). Grandma Staley said, "Because my pan was too small." My family has been cutting the top off the ham for five generations because Grandma Staley's pan was too small. That is the evolution of a recipe in my family.

Ingredients:

1 bone-in-ham* (about 12 lbs, but sometimes the smallest I can find is a 16 pounder)
1/2c whole cloves
1/2c packed brown sugar
1 (20oz) can pineapple rings in heavy syrup
Maraschino cherries
1 (12oz) can of 7-up or Sprite

Pre-heat the oven to 325˚F. Place the ham in the roasting pan and slice off the top of the ham (because Grandma Staley's pan was too small). Or, it turns out; you can leave the top on your ham. It doesn't make any difference. Score the rind of the ham with a diamond pattern. Press a clove into the center of each diamond. Drain the juice from the pineapple rings into a medium bowl. Stir in the brown sugar and soda. Coat the ham with this mixture. Arrange the pineapple rings over the outside of the ham. Place a maraschino cherry in the center of each pineapple ring. Secure with a toothpick.

Bake (covered) for three or four hours, basting frequently with the juices until the temperature of the ham is 160˚F. Be sure the thermometer is not touching the bone. Remove toothpicks before serving. I was a little worried that I'd cooked this ham too long. It looked overdone on the outside, but it was moist and tender and wonderful. This is probably because I basted it every thirty minutes or so, but I still told my husband it was because I'd cut the top off my ham the way my mother had always done it.

*After you serve the ham, save the bone. We'll use it in a soup later this week.

Friday, December 24, 2010

Smoked Salmon Spread


We ate Thanksgiving dinner my good friend Laura's house. My oldest told me, on good authority, that Pumpkin Pie was the only Thanksgiving food she likes. Luckily, she was wrong. On the way home my child, who hates fish and onions, asked if I would make this dip for her.

1 package salmon (I use the Star-Kist salmon in the pink pouch)
1 block of cream cheese
2 green onions, chopped (use more or less depending on personal taste)
Garlic salt, to taste
1 Tbsp liquid smoke

Mix all the ingredients together. Chill for at least one hour in the fridge. Serve with crackers of your choice.

Classic Holiday Fruit Salad


My mother made this salad for Thanksgiving and Christmas dinner every year I was growing up. It's a classic at our house. A girlfriend of mine made it last Thanksgiving and my kids loved it. So I'm pulling this old recipe out and it's going to be a holiday tradition at my house, too.

1 can pineapple chunks, cut up
1 can mandarin oranges
12 oz sour cream
1 bag miniature marshmallows
1/2 bag coconut
10 maraschino cherries, rinse, pat dry and slice in half

Drain fruit well. Mix everything together. Chill at least one hour before serving so that all the flavors can blend and the marshmallows become softer. Cherries are just for color, but seem to be a favorite for all the kids.

Christmas Morning Egg Bake


I am always looking for an easy breakfast food that tastes great and can be made ahead. That way I can spend Christmas morning playing with my kids and their new toys instead of cooking. This recipe is also really good for a lady's brunch at church.

You'll need:
8-10 hashbrown patties, cooked and broken apart
1 egg, beaten
salt and pepper

7 eggs
1/2c milk
1 can green chilies
mushrooms, sliced and sauted
1 1/2c cheddar cheese, shredded

Mix the hashbrowns and 1 egg. Pam a 9X13 casserole pan. Flatten the mixture into the pan with the back of a spoon. In a bowl, mix 7 eggs, milk, chilies, mushrooms, and cheese. Pour over hashbrown crust. Bake at 400˚F for 20-30 minutes.

For variation, sometimes I add cooked sausage to the hashbrown crust. You can also sprinkle cooked bacon over the top of your egg bake before cooking it.

Saturday, December 18, 2010

The Lost Art of Popping Corn


I learned how to pop popcorn on the stovetop as much out of necessity as for fun. Our microwave is acting wonky. It's one of those built in models. We told the property manager that it wasn't working properly, but I've learned this property management agency is slow to fix things. Bummer for us. Whenever we pop popcorn it pops maybe half the bag half of the time. The other half of the time nothing pops. So today, I learned how to pop popcorn using only a 5-quart pan and a lid. It's so easy that I can't believe I've never done it before. Plus, my lids are glass so I have the fun of watching the corn pop. I'm easily amused, I know.

You'll need

2 Tbsp oil, olive oil works just fine
1/4c of popcorn kernels
salt

Turn the burner on to a med-high heat. Add the oil to the pan with one or two kernels of popping corn. Hold the pan on the heat with the lid in place, shaking the pan back and forth a few times a minute. When these tester kernels pop, your oil is hot enough. Add the remainder of the popcorn kernels to the pan and replace the lid. Continue to shake the pan back and forth a few times a minute until the corn finishes popping. Pour into a bowl and add salt. The whole process takes less than five minutes.

Thursday, December 16, 2010

Blueberry Banana Bread


A girlfriend of mine was talking about this recipe on Facebook this morning. It sounded really yummy to me so I pulled up the recipe. Oh...my...this bread is really good. I made two loaves, but the kids ate up the first loaf in one sitting. I think the blueberries really make this recipe. Plus they just make this bread look so pretty when you slice it up.

The recipe was a total win for me. My kids like to ask for blueberries in their pancakes, and then they like to pick them out. Nobody picked out the blueberries this time around. A small win, but I take the wins where I can get them.

Ingredients:

2 cups of All Purpose Flour
1 tsp baking soda
1/2 tsp salt
1/2c shortening
1c sugar
2 eggs
2 tsp vanilla extract
2 medium ripe bananas, mashed
1c fresh blueberries

In a bowl, combine the flour, baking soda, and salt. In a large mixing bowl, cream the shortening and sugar. Add eggs and vanilla and mix well. Beat in bananas. Gradually add the dry ingredients, mixing just until combines. Fold in blueberries. Pour into two greased loaf pans. Bake at 350˚F for 30-35 minutes or until a toothpick inserted near the center comes out clean. Allow to cool for about 10 minutes before removing from pan.

Thursday, December 2, 2010

Honey Lime Enchiladas


Get out your grocery lists; make an extra run to the grocery store. I've found my new favorite Enchilada recipe. My sister made this for me the last time I went home to visit. It is so yummy. I think it's the lime that really makes this recipe unforgettable.

1.5 lbs of chicken, cooked and shredded
1/3c honey
1/4c lime juice (one lime if you are using fresh...and really, you should use a fresh lime)
1 Tbsp chili powder
1/2 tsp garlic powder
2(10oz) cans green enchilada sauce
2 pkgs flour tortilla, small
equal parts mozzarella and cheddar cheese, shredded

Combine honey, lime juice, chili powder and garlic powder. Mix well and add to the shredded chicken. Let the sauce soak into the meat for at least 30 minutes. Lightly spray two pans with PAM. (I used two 9X13 pans.) Pour green enchilada sauce into the pans. Be sure to coat the entire bottom. Fill the tortillas with shredded chicken and cheese mixture. Roll and place in the dish.

Pour the remainder of the enchilada sauce over the enchilada. Now sprinkle with more cheese. Be generous with the sauce and cheese. It matters! Bake uncovered at 350˚F for 30 minutes. Then broil just until the cheese is slightly brown and crispy. I may have browned mine a liiiiittle too much, but I like it a little crisy.

This recipe is really amazing. Roger liked it. The kids liked it. And it made enough that I can re-heat it for dinner tomorrow!

Wednesday, December 1, 2010

Pork Stew with Pears


I thought this stew was super tasty. The kids gulped it down easily. They loved the idea of pears in their stew. Roger says it's just weird to put fruit in your soup, but he didn't cover it in BBQ sauce, either, so I'm calling it a win all around.

2 Tbsp flour
2 tsp paprika
1 tsp cumin
1 lb pork tenderloin (well trimmed and cut into 1/4 inch chuncks)
1 Tbsp olive oil
2 onions (cut into 1 inch chunks)
2 green bell peppers (cut into 1 inch squares)
1 red bell pepper (cut into 1 inch squares)
3 garlic cloves, minced
2 medium pears (peel and cut into 1 inch pieces)
1/3c dry sherry
1/2c chicken broth
1/2 tsp each salt and pepper

Combine flour, paprika, and cumin. Dredge the pork in the flour mixture and shake off excess flour. Add olive oil to the Dutch oven and cook pork approximately 2 minutes per side. Do not overcook. Remove the pork from the pan and set aside. Add onions, peppers, and garlic to pan. Cook until the peppers are tender crisp, stirring frequently (about 5 minutes). Add pears and sherry. Bring to a boil and boil for 1 minute. Add broth, salt, pepper, and about 1/4 cup water. Bring to a boil. Return pork to the pan, reduce heat, and simmer for 3 minutes (uncovered) until pork is cooked through and the pears are tender. This stew can be made up in advance and gently reheated at serving time.

Friday, November 26, 2010

Turkey Noodle Soup


I opened my fridge this morning and couldn't decide what to do with all the leftover turkey. Our host and hostess sent us home with the second turkey, a nine pounder that we hadn't even sliced into! (Many thanks to the Alpuches cause this soup was delicious.) Since there is more than enough for sandwiches for a week and because my kids lose interest very quickly; I decided to make soup.

Ingredients
5 carrots, sliced
5 celery sticks, sliced
1/2 onion, because it was hanging out in the fridge looking innocent
1 tsp poultry seasoning
1 tsp sage
5 bouillon cubes
3c leftover turkey, shredded or cut into bit sizes
6oz egg noodles


Start by putting 5 cups of water and 5 bouillon cubes in a pot. Slice the vegetable and throw them in the pot with the poultry seasoning and the sage. Bring to a boil. Lower the heat and simmer the vegetables for about twenty minutes. Cut or shred the turkey and add to the soup. Toss in about half a package of egg noodles (about 6 oz) and summer for an additional 10 minutes. Salt and pepper to taste. Add more water as needed, but I don't like my soup to be too watery.

Wednesday, November 24, 2010

Pumpkin Chai Cheesecake


Do you know what I'm thankful for this year? I'm thankful that the holiday health food trend is losing popularity. I watch what I eat (for the most part) all year long. I don't want to eat Weight Watchers crust-less 2 point pumpkin pie for Thanksgiving. I don't want to eat a low fat, dry, tasteless turkey stuffing. I want flavor. I want the real thing.

This year, I found a Pumpkin Chai Cheesecake with Caramel-Rum sauce. It's far from health food, but I'm making it to take to my friend Laura's house for Thanksgiving. That lessens the chances that I'll be eating it for breakfast, lunch, and dinner the next few days. Now, I'm stepping a little out of my comfort zone here, I've never made a real cheesecake. But this just looked too good to pass up.

Ingredients:

Crust
2c crushed cinnamon Teddy Grahams
1/4c butter, melted

Filling:
4 packages (8oz each) cream cheese, softened
1 1/2c white sugar
4 eggs
1c pumpkin puree
2 tsp pumpkin pie spice
3/4 tsp ground cardamom

Sauce:
1/3c packed brown sugar
1/3c light or dark corn syrup
2 Tbsp butter
1/3 cool whip
1 Tbsp rum extract

Garnish:
Cool Whip

Preheat the oven to 300˚F, Spray a 9 inch spring form pan with cooking spray. In a small bowl, mix the crust ingredients. Press mixture in bottom and about 1 inch up the side of the pan. Bake for 8-10 minutes. To minimize cracking, place a shallow, half full, pan of water on the lower oven rack.

In a large bowl, beat cream cheese and white sugar with an electric mixer on medium speed until light and fluffy. Beat in eggs, one at a time, until blended. Spoon about three cups of mixture into crust. Spread evenly. To the remaining mixture, add pumpkin, pumpkin pie spice, and cardamom. Mix until smooth. Spoon mixture smoothly into the pan.

Bake for about 1 hour and 25 minutes. The edge of the cheesecake should be set at least 2 inches into the cheesecake, but the center will still be jiggley. Is that a real word? Turn the oven off and open the oven door at least 4 inches. Let the cheesecake remain in the oven for 30 minutes. Then let the pan cool an additional 30minutes before refrigerating. Refrigerate cheesecake for at least 6 hours, but no more than 24 hours.

Before serving:

In a small saucepan, heat brown sugar, corn syrup, and 2 Tbsp butter to boiling over a medium-low heat, stirring constantly. Boil for 5 minutes, stirring constantly. Stir in cool whip. Heat to boiling. Remove sauce from heat and stir in the rum extract. Cool until warm.

Just before serving, run small spatula around the edge of the cheesecake to separate from the pan. Carefully remove side of pan. Top individual slices of cheesecake with warm sauce and a dollop of cool whip. Refrigerate remaining cheesecake.

(Cook's preference: The caramel sauce is pretty yummy and it looks really cool when you serve it up, but this cheesecake holds its own. If you want to skip the sauce it's still a spectacular dessert...very rich, would be awesome with coffee...if I drank coffee.)

Grandma's Homemade Apple Pie


Okay, so it's not my Grandma's Apple Pie, but it could totally be someone's Grandma's Homemade Apple Pie. It's just that good!

Let's talk about the dough first. This pie dough recipe is an awesome recipe from the pros at Cook's Illustrated. The secret ingredient is vodka. It allows the dough to be super malleable to roll out while still maintaining a buttery and flakey texture. The vodka cooks off and the steam from the evaporating vodka is what makes the pie crust so flakey. I don't drink a whole lot of vodka (mores the pity), but the little 50ml bottles they sell at the checkout counter of your local liquor store is just enough for this recipe.

Who am I kidding? It's Thanksgiving. You've got family coming into town. Your sister's going to be telling you how her kids never throw temper tantrums. You love her and her kids, but who needs that kind of pressure? Your dad is going to be pointing out every parenting mistake you are making. You better go back for the big bottle, maybe two. It'll get you through the day and will help you keep your mouth shut as the family drama plays out.

For a nine inch double pie crust:

2 1/2c flour
1 tsp salt
2 Tbsp sugar
12 Tbsp butter
1/2c shortening
1/4c vodka
1/4c water

Combine 1 1/2c of the flour, salt, and sugar. Add the butter and shortening. Cut ingredients together until dough starts to collect in uneven clumps. Cut in the remaining flour. Sprinkle water and vodka over the mixture. With a rubber spatula, use a folding motion to mix until the dough is slightly tacky and sticks together. Divide the dough into two balls. Cover bowl in plastic wrap and refrigerate at least 45 minutes. You can store the dough for up to two days.

While the dough chills make the filling:

6c apples; cored, peeled, and sliced (about 7 depending on their size)
2T tapioca
1/2 to 3/4 c sugar
1/2 tsp cinnamon
1/4 tsp nutmeg

How much sugar you use depends on personal taste and the type of apple you use. I use Braeburn apples and a little more than 1/2c sugar. If you use a tart apple like Granny Smith; you may need closer to 3/4c of sugar.

Mix the dry ingredients and add the apples. Mix well. Sprinkle some flour on your kitchen counter and roll out the crust. Put the crust in a 9 inch pie plate. Add filling. Put a few dollops of butter on the apple filling. Add the top crust. Cut a few X's on the top crust to let the pie vent while it cooks. Refrigerate the pie for about 15 minutes. Brush the top of your pie with water and sprinkle with sugar. Bake at 450˚F for 20 minutes. Turn down the oven to 350˚F for 20 minutes. Let the pie cool for at least 30 minutes before serving.

Apple Peeler


I bought this gadget at Target a few years ago. It is an essential tool for making Homemade Apple Pie. It easily attaches to your kitchen counter or table if you need to sit down. It cores and evenly peels your apples and all you have to do is turn the handle. Cleaning it is a little difficult because of all the intricate parts, but it is worth it!

Cranberry Salad


When I was a kid, the only thing I knew to do with cranberries was to string it up with popcorn to decorate a tree. Oh, and they make tart juice with cranberries. That was about it. Last year for our Thanksgiving program, someone brought this salad. I didn't even know it had cranberries in it until I looked at the recipe. I made it for our Christmas dinner and again at New Year. This is a really easy recipe to throw together; however, you have to start this recipe the day before you serve it. You have to give the flavors time to mingle.

2c raw cranberries
3 apples
1 can crushed pineapple
1/2c white sugar
1c mini marshmallows
1c cool whip

In a food processor or blender, finely chop the apples and cranberries. It's okay if there are still some apple chunks; after all, nobody likes a showoff, especially around the holidays. Drain pineapple. Add pineapple and sugar to the mixture. Stir mixture together and let it sit in the fridge overnight. About an hour before serving, add the marshmallows and the cool whip.

Tuesday, November 23, 2010

Chewy Sugar Cookies


Today was the trial run to the Girl Scout Baking Party I'm having next month. I think it might be the first sign that I'm certifiable. I am inviting thirty girls (ages 6-8) to my house, to trash my kitchen in the name of baking, frosting, and decorating cookies. However, they'll be earning badges and hopefully taking all the cookies with them at the end of the day. Here is the recipe we'll be making minus the frosting and sprinkles that I'll figure out later:

2 1/4c flour
1/2 tsp baking soda
1 tsp baking powder
1/2 tsp salt
1 1/2c sugar, plus 1/3c sugar for rolling the dough
2 oz cream cheese, cut into 8 pieces*
6 Tbsp butter, melted
1/3c vegetable oil
1 egg
1 Tbsp milk
2 tsp vanilla extract

*Most sugar cookies do not call for cream cheese, but I found the cream cheese cut the sweetness of the cookie and really rounded out the flavor.

Preheat the oven to 350 degrees F. Whisk flour, baking soda, baking powder, and salt together in a medium sized bowl. In another bowl, combine sugar, cream cheese, and warm butter with a fork. Whisk in oil until smooth. Add egg, milk, and vanilla. Continue to whisk mixture until smooth. Add wet ingredients to the dry ingredients. Combine until a soft homogenous dough forms.

Divide dough into 24 equal pieces. Using your hands, roll the dough into a ball. Put about a third of a cup of sugar in a small bowl. Roll dough balls in the sugar before spacing them evenly on 2 cookie sheets. Using a drinking glass, flatten dough balls until they are about 2 inches in diameter. Then flip the cookie over so the top of your cookies doesn't read: IKEA 365 like mine did. Bake, on cookie sheet at a time, for 14 minutes. Rotate the cookie sheet about half way through. If you over cook these cookies, they will lose their chewiness.

Wednesday, November 17, 2010

Pizza with Olives, Mushrooms, and Capers

I must say that I am becoming more and more comfortable in the kitchen. I'm starting to feel comfortable gauging which ingredients will complement each other. I'm also starting to cook (a little) without relying so much on my measuring spoons, which is nice because there are fewer dishes. Anyway, except for the dough, the measurements for this recipe are approximate. You can use more or less depending on how sassy you are feeling.

Ingredients:

1 package of Betty Crocker Pizza Crust mix
Contadina pizza sauce in the squeeze bottle
Olive oil (Pam works just as well)
1/4 c kalamata olives, sliced
8 fresh mushrooms, sliced
1 Tbsp capers
Mozzarella Cheese

Preheat oven to 450 degrees F. Mix the pizza mix with 1/2c hot water. Knead dough just a little. Pour a little olive oil on the pizza pan and press out your pizza dough. Squeeze some pizza sauce onto the dough using the back of a spoon to spread it out. In a skillet, sauté the fresh mushrooms. Sprinkle the mushrooms, olives, and capers evenly across your pizza. Sprinkle mozzarella over the top of your pizza.
Bake pizza for 20 minutes.

I loved this pizza. Kalamata olives are a lot stronger than canned black olives. I think they are too strong to eat straight, but sliced on a pizza they are just right. The capers were a little tangy and the olives were almost sweet. I didn't provide a picture because a) I forgot the camera in the race to gorge myself on this pizza and b) we all know what a pizza looks like, right?

Monday, November 15, 2010

Cheddar Twisters


These are great rolls to serve with soup. The combination of the cheese, green onions, and garlic really complimented the Broccoli Cheese Soup. I'll bet it would be delicious with the Pumpkin Soup, too. These were so good, but I had to push away from the table because one of these rolls uses the dough of two cresent rolls. Yummy, but easy to overindulge.

Ingredients

2 cans (8 oz each) Pillsbury cresent dinner rolls
1 1/2c shredded sharp Cheddar cheese
4 green onions, chopped
1 egg
1 tsp water
2 tsp sesame seeds
1/2 tsp garlic salt mixed with 1/2 tsp dried parsley

Preheat the oven to 375 degrees F. Lightly grease a large cookie sheet with PAM. Unroll both bans of dough, separate the dough into 8 rectangles. Firmly press perforations to seal. In a small bowl, mix cheese and onions. Spoon this mixture evenly onto the middle of the 8 rectangles of dough. Fold the dough over lengthwise to form a long strip. Firmly press the edges together and twist the strip 3 or 4 times bringing the ends together to form a ring. Place on the cookie sheet. In another small bowl, beat egg and water together until well blended. Brush egg over the dough. Sprinkle dough with sesame seeds and garlic/parsley blend. Bake for 20 minutes. Cool for about 5 minutes. Best when served warm.

Broccoli Cheese Soup


I've had this recipe forever. I think my friend April gave it to me, but I'm not sure. I'm definately in a soup mood this week. Must be the weather.

Ingredients

onion, chopped
1/4c flour
1/4c butter
2c chicken stock
2 heads of broccoli, cut up
2 carrots, chopped
1/4 tsp nutmeg
1c cheddar cheese

Pam the bottom of your pan. I use a big pot so I have fewer dishes. Saute onion and set aside onion. Melt butter in the bottom of the pan and add flour. Whisk flour into butter. Add chicken broth and simmer for twenty minutes. Add broccoli, carrots, and onion. Cook over a low heat until vegetables are done, roughly twenty minutes should do it. Salt and pepper to taste. Pour into blender and puree. Return to pot. Over a low heat, add cheese and nutmeg. Let the cheese melt a little before serving.

Saturday, November 13, 2010

Tortilla Soup


Don't be fooled by this soup. By looking at the ingredients, you'd think this soup is going to need a side or you'll be hungry in another half an hour. This soup stands alone. It very filling and yummy, too.

1 small onion
1 (4oz) can diced green chilies
2 cloves crushed garlic
1 Tbsp oil
1 c. tomato, diced
1 can beef broth
1 can chicken broth
1 1/2 c. water
1 1/2 c tomato juice
1 tsp cumin
1 tsp chili powder
1 tsp salt
1/8 tsp pepper
2 tsp Worchestershire sauce
3 corn torillas
1/4 c. cheddar cheese
avacado*
sour cream*

Saute onions, green chilies, and garlic in oil. Add tomato, beef and chicken broth, water, juice, spices, and Worchestershire sauce. Say Worchestershire five times really fast. Bring to a boil. Lower heat and simmer for one hour. Cut tortillas into strips. Add tortillas and cheddar cheese to soup. Simmer for ten minutes. Serve with warm tortilla, avacado, and sour cream. I like to sprinkle a little cheese on the soup right, too.

*These ingredients are optional. They look pretty, but the soup tastes great with or without them.

Wednesday, November 10, 2010

Bagel with Basil and Cream Cheese


I am my mother's daughter. I admit it. I hate to waste food. I find it irritating to buy special ingrediants for a recipe only to let the rest of that ingredient go to waste because I'm not sure where else to use it. I bought basil a few weeks ago for the Mediterranean Pasta Salad. Here's how I used it so it wouldn't go to waste.

Ingredients

Seeded Bagel
Cream Cheese
4 or 5 fresh Basil leaves, chiffonade*
Tomato
Salt and Pepper, to taste

*roll the basil leaves together tightly and slice thinly

I usually freeze my bagels so they don't go bad. While my children love to have bites, they rarely want a bagel of their own. I outsmart them by toasting both bagel halves. I know that between them, they'll eat at least half of a bagel...but, I digress. Toast the seeded bagel. Add cream cheese and basil. Cut tomato in half and slice each half. Top your bagel with tomato. Salt and pepper to taste.

Tuesday, November 9, 2010

Cinnamon Rolls for Autumn


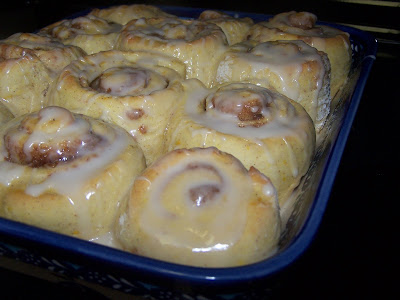
These cinnamon rolls have been calling to me for weeks, months maybe, ever since Jen shared the recipe. Ironically, I'm trying to watch my weight right now so I'll be sending most of these to work with Roger to endear myself to his new co-workers.

I've adapted this recipe from a website called Don't Eat Off the Sidewalk. Good advice, but do you think she takes the five second rule into consideration?

Now that I'm more comfortable cooking, I've started looking at a recipe and automatically making substitutions for things I have in the house. This recipe was originally vegan, but I don't keep soy milk in the fridge, so I'm substituting skim milk. Also, the original recipe calls for 3/4 c pumpkin, but I froze my pumpkin in
1 c increments, so I'm tossing it that last 1/4 cup because I'm too lazy to re-measure it out.

Dough:

1 package dry yeast
1/4 c warm water
1 c pumpkin puree
1/4 c milk
1/4 c margarine, melted
1 Tbsp white sugar

2 1/2 flour
1 1/4 tsp salt
1/2 tsp cinnamon
1/4 tsp nutmeg
1/4 tsp ground ginger

3/4 cup flour
1 Tbsp oil

Filling:
3 Tbsp sugar
3 Tbsp brown sugar
2 Tbsp flour
1 1/2 cinnamon
2 Tbsp chilled margarine, cut into small peices

Glaze:

3/4 c powdered sugar
1 Tbsp water
1/4 tsp vanilla extract

In a large bowl, combine the warm water with the yeast and whisk together. Let stand for five minutes. Add the pumpkin, milk, margarine, and sugar to the yeast. Lightly mix. Add 2 1/2 cups flour, salt, cinnamon, nutmeg, and ginger. Beat together until smooth.

Turn dough out onto your floured kitchen counter. Take the remaining flour and use it to flour the top of the dough and your counter as your kneed the dough (about 10 minutes). The dough will be elastic, but soft and still a little sticky to the touch without being floured. This was the part that Kaitlyn liked the best. I let her pull her stool up to the counter and let her knead the dough with me. Of course, then she wouldn't leave the dough alone while it was rising so I had to shoo her out of the kitchen while the dough was trying to rise.

Place the dough in a large bowl coated with oil, turning the dough to coat the top of the dough as well. Cover and let rise until dough doubles in size.

Punch down the dough, cover and let rise for five minutes.

Combine the sugar, brown sugar, flour, and cinnamon in a small bowl. Cut in the margarine with fork until mixture resembles coarse little balls.

Roll the dough into a 12X10 inch rectangle on your floured counter. Sprinkle with brown sugar mixture. Roll up the rectangle tightly, from the long side, pinch seam, and ends to seal the dough. Cut roll into 12 (1 inch) slices. Place into a 9 inch square baking pan coated with cooking oil.* Cover and let rise until it doubles in size (about 25 minutes).

Bake the rolls for 20 minutes or until golden brown in a pre-heated (375 degrees) oven.

In a small bowl, combine the powdered sugar, water, and vanilla. Whisk together until smooth. Drizzle over the cinnamon rolls.

*If you want to eat these hot and fresh in the morning (Saturday morning, maybe?)without having to get up before first light to start them; you can cover them with plastic wrap at this point and store them in the fridge. In the morning take them out and continue with the recipe (they will take a little longer to rise, probably an hour or so, because they are chilled). Take this time to shower, enjoy a cup of tea, dig out your fat pants, and call your sister to wake her up on the one morning her baby actually let her sleep in.

Wednesday, November 3, 2010

Iced Pumpkin Cookies


This is my favorite time of year. I love baking in the autumn...and if you've been following my blog you'll notice a slight favoritism for cooking with Pumpkin. This morning Kaitlyn asked where her baby pumpkin went. I told her we were going to make her baby pumpkin into cookies today. She was on board.

2 1/2 cups all-purpose flour
1 teaspoon baking powder
1 teaspoon baking soda
2 teaspoons ground cinnamon
1/2 teaspoon ground nutmeg
1/2 teaspoon ground cloves
1/2 teaspoon salt
1/2 cup butter or shortening, softened
1 1/2 cups white sugar
2 cups canned pumpkin puree*
1 egg
1 teaspoon vanilla extract

*I used some of the puree that I made yesterday. It tasted the same as the stuff I buy at the grocery store.

For the Icing

2 cups confectioners' sugar
3 tablespoons milk
1 tablespoon melted butter
1 teaspoon vanilla extract

Directions

Preheat oven to 350 degrees F (175 degrees C). Combine flour, baking powder, baking soda, cinnamon, nutmeg, ground cloves, and salt. In a medium bowl, cream together the 1/2 cup of butter and white sugar. Add pumpkin, egg, and 1 teaspoon vanilla to butter mixture. Beat until creamy. Mix in dry ingredients. Drop on cookie sheet with a spoon. Bake for 15 to 20 minutes in the preheated oven. Cool cookies, then drizzle glaze with fork.

To Make Glaze combine confectioners' sugar, milk, melted butter, and vanilla. Add a little more milk as needed, to achieve your desired drizzling consistency. I made half the cookies with icing and half without. Kaitlyn prefered them without, but I liked both. If there are any left when Roger gets home....I'll ask which one he prefers.

Tuesday, November 2, 2010

Pumpkin Soup


When we were in Germany we went to a Pumpkin Festival. We had some Pumpkin Soup that was AMAZING! I've been searching for a good Pumpkin Soup recipe ever since. This is the first Pumpkin Soup recipe that has brought back memories of Autumn in Germany. This soup is amazing. I really love the flavor of the pumpkin and onions. I think I can taste the mace, too. I think this soup would well complimented with some cheesy or buttery dinner rolls.

3 cups fresh pumpkin, peeled and diced
5 cups chicken broth or 5 cups of water with 5 bouillon cubes
1 onion
1 Tbsp butter
1/4 tsp nutmeg
1/4 tsp mace
1 Tbsp honey
2 Tbsp syrup
1/2 cup half and half
salt and pepper to taste

Bring broth to a boil. Add pumpkin and simmer until tender. Saute the onion in the butter until soft. Add onion to pumpkin mixture. Move soup to blender and puree it. Return soup to pot and add salt and black pepper. Add the honey, syrup, mace, and nutmeg. Stir in the cream for a richer flavor.

Puree Pumpkin


I woke up on yesterday and realized that we'd forgotten to carve pumpkins for Halloween. So what am I going to do with these pumpkins that have been decorating my front porch for the last few weeks? Then it occurred to me that it's silly to throw out three perfectly good pumpkins and then run to the grocery store to get Pumpkin for baking Thanksgiving goodies.

So here's how to make your own Pumpkin Puree. Preheat oven to 350˚F. You don’t need to cut the pumpkin open before you roast it. I’m not kidding. Just jab it with a knife four or five times to vent the steam. (Is it weird that I think of the movie Psycho when I do this? Never mind, don't answer that.) Put the whole darned thing on a baking sheet, and pop it in the oven for an hour or so, until you can easily stick a knife into it. Cool, then scoop out the seeds and stringy stuff with a spoon. It is SO MUCH EASIER than when it is raw. Skin the pumpkin with a paring knife. Cut it up into chunks. If you cut it up and realize the pumpkins not quite done...pop it back in the oven for 15 or so more minutes. Run the pumpkin chunks through a blender or food processor. I add a little bit of water to the blender to make it easier to puree.

Freeze the pumpkin in Ziploc freezer bags for future use in baking pumpkin cookies, pumpkin pie, pumpkin soup...whatever makes your skirt fly up.

Monday, November 1, 2010

Cheese Plate


The first time I read about a cheese plate was in a book of recipes written by the Barefoot Contessa. My mom didn't do cheese plates. I'm not sure my mom ever did appetizers...There were those rice pockets things she always brought to Grandma's Christmas party, but I digress.

I really miss the cheeses that I could buy in Germany. I'd make a cheese plate with a French cheese called Comte and a Dutch cheese from Old Amsterdam. Yummy. I haven't found those cheese at my local supermarket, but that's okay. They were yummy, but not essential to the cheese plate.

When making a cheese plate for a dinner party, women's lunchon, or church pot luck all you have to do is cut up some of your favorite cheeses. I used Cheddar, Brie, and Fontina on this plate. Fontina is a mild Spanish cheese that I found in the Deli. I usually try to mix up the cheeses...something mild and something strong. Add some crackers. I used Sociables and Town House crackers. Then add some grapes. I cut the grapes into little bunches and left them on the vine to make them easier to pick up. I also sliced up some red and yellow bell peppers to add a flash of color to the plate. You can really be creative with this appetizer. Arrange your ingrediants on a pretty plate and refidgerate until needed.

Tuesday, October 19, 2010

The Best Lasagna. Ever.


I found this recipe on the Pioneer Woman's website. She calls it The Best Lasagna. Ever. The title alone made a believer outta me. I think that Lasagna is a lot of work to make. Now, I love to cook, but I don't want to take on Lasagna unless I know the payoff is going to be worth it. This one is worth it!

Ingredients:
Lasagna noodles, about 8
2 cloves garlic, minced
1 lb Jimmy Dean Pork Sausage, hot
1.5 lbs ground beef
2-14.5 oz cans whole tomatoes
2-6 oz cans tomato paste
2 Tbsp Parsley (meat), 2 Tbsp Parsley (cheese)
2 Tbsp Basil
1 tsp salt, 1/2 tsp salt (water), 1 tsp salt (cheese)
1 Tbsp olive oil
24 oz cottage cheese
2 eggs, beaten
1/2 c Parmesan cheese
2-8oz packages Mozzarella cheese slices

Meat:

Put the pork sausage, ground beef and garlic in a large skillet. Cook the meat and drain off the grease. Add the tomato paste, whole tomatoes with juice, 2 Tbsp Parsley, 2 Tbsp Basil* and 1 tsp of salt. Mix well and simmer for 45 minutes.

*I used fresh basil instead of dried because I have it (for the Mediterranean Salad I made Sunday). I just rolled six leaves tightly and sliced it thinly. Then I sliced it a few long ways for good measure.

Noodles:

While meat is simmering, bring a large pot of water, 1/2 tsp salt and 1 Tbsp of olive oil to boil. Add the noodles, two or three at a time until pot is full. Boil the noodles for about ten minutes. After draining the noodles and rinsing with cold water, lay out the noodles on a cookie sheet. (for easier handling later)

Cheese:

Combine cottage cheese, eggs, Parmesan cheese, 2 Tbsp Parley, 1 tsp salt. Mix well.

After the meat, cheese, and noodles are ready, make an assembly line on your kitchen counter. Lay four noodles on the bottom of your 9X13 casserole dish, overlapping as you go. I'm using a pretty Polish Pottery Dish that Roger bought me for Mother's Day one year. Spread 1/2 the cheese mixture across the noodles. Lay down 1/2 of the Mozzarella cheese slices. If they are sliced really thinly, go ahead a double up the layer. Repeat with the other half of your noodles, cheese, Mozzarella, and meat. Now generously sprinkle Parmesan cheese on the top of your Lasagna.

Now bake the Lasagna at 350 degrees F for about 60 minutes. Or, if you are like me and made this Lasagna in the morning so you'd free up the afternoon to fight a child that doesn't like to do her homework, cover the Lasagna with plastic and put it in the fridge for later. It can refrigerate, unbaked, for about two days.

Sunday, October 17, 2010

Mediterranean Pasta Salad


I got a little worried while I was making this salad. My family generally protests ingredients like raw onions, olives, and tomatoes. But the combination of all these ingredients was pretty amazing. It was a little salty thanks to the feta cheese and the kalamata* olives. It was a little sour and tangy thanks to the red wine vinegar in the vinaigrette. It was really yummy!

Note about kalamata olives: Kalamata olives are a burst of flavor. They are saltier than black olives. You could probably substitute black olives in this recipe, but black olives are very mild and I think you'd be missing out.

Salad:

4 oz bow tie pasta, cooked
2 cups cooked chicken, diced
1/2 cup feta cheese
1 cup grape tomatoes, halved
1 cup artichoke hearts, chopped
1 cup kalamata olives, halved
1/2 cup red onion, sliced thinly
5 basil leaves, chiffonade*
1/4 cup pine nuts

*roll the basil leaves together tightly and slice thinly

Vinaigrette:

3 Tbsp olive oil
3 Tbsp canola oil
juice of 1 lemon
1 clove of garlic, minced
3 tsp red wine vinegar
1/4 tsp oregano

Prepare the vinaigrette first. Combine all of the ingredients together in a Tupperware container. Add the lid and shake it up. Set aside to allow flavors to mingle.

Cook the pasta in well seasoned water (per instructions). Drain and rinse with cool water. Add the chicken, feta cheese, tomatoes, artichoke hearts, olives, basil, and pine nuts. Toss the salad with the vinaigrette and serve immediately. I added a little basil to the top of the salad as garnish.

Wednesday, October 13, 2010

Olive Bread


One of my favorite things to do in Germany was to visit the local bakery. All their bread was yummy, but my favorite was olive bread. It was snack when Kaitlyn and I would go grocery shopping on the German economy. Like every toddler, she knew the routine. As soon as we finished at the cash register, she'd start asking to go to the bakery. Now that we've been back in American for a few months, I'm starting to jones for some olive bread. Olive bread is an amazing snack, I'm sure you could serve it to compliment another dish, but it never lasted that long at my house. We eat it up too fast.

Ingredients:
3 cups bread flour
1 packet of active dry yeast
2 tablespoons white sugar
1 teaspoon salt
1 cup olives, roughly chopped*
3 tablespoons olive oil
1 1/4 cups warm water
1 tablespoon cornmeal

*The original recipe calls for black olives, but you can really use any kind of olive. The olives in the bread in German were big green olives that were bursting with flavor. For this recipe, I used Tassos Mediterranean Olives.

Directions
1.In a large bowl, mix together flour, yeast, sugar, salt, black olives, olive oil, and water.
2.Turn out dough onto a your floured kitchen counter. Knead until smooth and elastic, 5 to 10 minutes. Set aside, and let rise about 45 minutes, until it doubles in size. Punch down. Knead well again, for about 5 to 10 minutes. Let rise for about 30 minutes, until it doubles in size.
3.Round the dough on your kitchen counter. Place upside down in a bowl lined with a lint-free, well floured towel. Let rise until double in size.
4.While the bread is rising for the third time, put a pan of water in the bottom of the oven. Preheat oven to 450 degrees F.
5.Gently turn loaf out onto a sheet pan that has been lightly oiled and dusted with cornmeal.
6.Bake loaf at 450 degrees F for 15 minutes. Reduce heat to 375 degrees F. Bake for 30 more minutes, or until done.

How to Proof Yeast


If you are a seasoned baker, you know that yeast is a "living" ingredient. As it digests sugar, it releasing alcohol and carbon dioxide that causes your bread to rise. If your yeast is dead, your bread will not rise. "Proofing" the yeast is how you determine whether your yeast is alive or dead.

To proof yeast, combine 1/2 cup of hot water (about 100 degrees), and 1 Tablespoon of sugar. Stir your sugar and water until the sugar is completely disolved. Add a package of yeast. After five or ten mintues, the yeast should begin to form a creamy foam on the surface of the water. If the yeast is dead, there will be no foam in the bowl and you should start over with a new packet of yeast.

Friday, October 8, 2010

California Sushi Rolls


I had a sushi craving last night...so after our appointment at Edward Jones, we stopped by Safeway and bought some terrible, stale sushi. It was awful, but it was also motivation to pull out the old recipes and make some sushi at home.

I'll be honest, making sushi rolls isn't a piece of cake. It takes time...and practice...but even when they look a little lopsided, they taste pretty wonderful. I'll try to keep this entry pretty simple (and I took lots of pictures).

You have a lot of options when it comes to what goes in your sushi. Here is a short list, but my recommendation is to pick only three otherwise your sushi becomes difficult to roll.

avacado
cucumber, seeded
red or yellow pepper
carrot
imitation crab

Before you get started assembling the sushi, slice the vegetables and crab into long slices.

You'll also need:

a bamboo rolling mat(called a makisu)
sushi rice (see earlier blog entry)
seaweed wraps (also called nori)
roasted sesame seeds
pickled ginger* (also called Gari)
wasbabi sauce*
soy sauce*

*these ingredients are optional


When making sushi, it is a good idea to wrap the bamboo rolling mat in plastic wrap. This makes clean up so much easier because you won't have to pick the rice out from between the pieces of bamboo.


Cut the Nori in half and spread the rice on one side of the Nori.


Flip your Nori over (rice side down) and lay your vegetables down the center of your Nori. I used red pepper, avacado, and cucumber.


Roll your sushi. See that little bit? I am going to add a little rice to cover up the seam.


Roll your sushi again. Now sprinkle with sesame seeds.


Transfer the sushi roll to a cutting board and cover with a piece of plastic wrap.


Cut the sushi roll carefully with a sharp knife. Cut the roll in half first, then quarter, then eights. This helps the sushi maintain it's shape.


Transfer to a plate and serve with Gari, Wasabi and Soy Sauce. Here's what the they look like. I found these ingredients in the Asian aisle at our commissary.


Sushi Rice


The first time I introduced my husband and children to Sushi we were in Paris, France. There was a sushi shop next to our hotel so I picked some up and brought it back to the hotel for dinner. Kaitlyn LOVED it. She gobbled it right up. Roger liked it more after he'd had a piece or two. Maura was a little suspicious at first, but I think she's coming around. I love eating Sushi, but I have to admit it's pretty expensive to buy...so I scoured the internet and various cookbooks for a good Sushi recipe...this is what I found.

First you have to start with a good sushi rice....meaning short grain or medium grain. Some packages of rice are marketed as "Sushi" rice, but really any short or medium grain rice will do. You want to rinse the rice until the water runs totally clear (about five or six times). Cook the rice in a rice cooker. The general rule of thumb is a cup of water in the rice cooker for every cup of rice. If you put a little too much in, no worries, the extra water will boil off.

Next you make your Sushi "Su" to mix with the rice. You'll mix 1 part of Su for every 4 parts of cooked rice. The recipe below is enough for about 3 1/2 cups of rice.

1/2 cup rice vinegar*
1/4 cup sugar
1/8 cup mirin

*I think this recipe is a tad too sweet so I splash a bit more vinegar into the su.

1. Heat vinegar, sugar, and sake or mirin in a saucepan just to dissolve and combine. Allow to cool to room temperature.
2. Cook rice according to rice cooker directions. Transfer to large mixing bowl.
3. Pour su (vinegar mixture) over the rice, gently folding to incorporate.
4. Let rice stand for 10 minutes, then fold again.

Thursday, October 7, 2010

Found These on My Camera

I found these when I was downloading pictures from my camera. Kaitlyn (age 3) has covertly been borrowing the camera and taking pictures of her meals...just like mommy.


Monday, October 4, 2010

Halloween Pumpkin Cookies


This is a pretty easy recipe to make. I acquired this recipe when Roger and I were first married. It came in the monthly newsletter that our apartment complex distributed...along with safety tips and a reminder that it was, in fact, illegal to sell drugs out of your apartment. Ahhh the memories of being newlywed and broke...

1 stick butter or margarine (Crisco is a good substitute, too)
1/2 c sugar
1 egg
1/2 c pumpkin
1/2 tsp vanilla
1 c flour
1/2 tsp baking soda
1/4 tsp salt
1/2 tsp of cinnamon

Preheat oven to 375 degrees. Cream the butter and sugar together in a bowl. Add egg, pumpkin, and vanilla. Sift dry ingredients together and add to bowl. Drop by tablespoon onto a greased cookie sheet. Bake for about 15 minutes or until lightly browned.

Saturday, October 2, 2010

Sweet Potato Casserole


My daughter had a writing assignment. The question was, "What is your favorite season and why?" I'm sure that my third grade teacher posed the same question to my class. I have no idea how I answered it in the third grade, but if Ms. Martz asked me that question today I'd say that my favorite season was fall. I love fall. Have I ever mentioned that? I love watching the leaves turn colors. I like the crunchy sound that fall makes when you are walking in the leaves. I used to bring the leaves home and decorate my desk with all the oranges, reds, and yellows. I love my cloth pumpkins made with their Halloween and autumn fabrics that decorate my mantle. I love the smell of baking in the fall...Sweet Potatos, Pumpkin, Cinnamon...it's the most homey, comforting, safe smell. Here is a dish that is perfect for celebrating autumn and it's tasty, too. I like this recipe because the sweet potatos aren't smothered in marshmellows...not that marshmellows are bad...I think I've just outgrown them.

2 1/2 lbs sweet potatos
2 eggs, lightly beaten
3 tbsp butter, melted
2 tbsp brown sugar
1/2 tsp cinnamon
1/2 tsp ginger
1/4 tsp nutmeg
freshly ground pepper
1/4 c pecans, coarsly chopped

Preheat oven to 400 degrees F. Pierce sweet potatos a couple times with a fork. Bake for 45-50 minutes. Set aside to cool. Turn oven down to 350 degrees F. Peel skin off the potatos and slice into about one inch chunks. Put into a med bowl and mash. Add eggs, butter, brown sugar, and spices. Mix until smooth. PAM a 8X8 casserole dish. Add mixture. Sprinkle with nuts. Bake for 30 minutes. Serve immediately.

Friday, October 1, 2010

Baked Beans


Can we all just agree that there are very few things in this world that don't taste better after you add bacon? My husband loves pork and beans. He hates anything else that contains beans. Go figure. When I first made this recipe for the man of my dreams...well, lets just say that some accusations were made. We'd been married for five or six years and he was of the opinion that I was holding out on him. I'm of the opinion that I've got a secret weapon to wheedle my way back into his good graces the next time I'm in the doghouse.

3 cans (15 oz) pork and beans
1/3 c ketchup
1/3 c brown sugar
1/2 med onion
3 tsp mustard
1 lb bacon

Fry bacon and cut into small pieces. Combine all ingredients into a 5 quart casserole dish. Bake at 350 degrees for 1 hour.

Monday, September 27, 2010

Pumpkin Oatmeal Cookies


It's fall. The temperature is a little more barable. The leaves are turning. One of my favorite things about autumn is cooking "fall food". I love cooking with pumpkin. It smells so amazing. This is a recipe that my friend Jen shared with me. It's a vegan recipe so it's great if your kids are allergic to eggs.

Ingredients
2 cups flour
1 1/3 cups rolled oats
1 teaspoon baking soda
3/4 teaspoon salt
1 tsp cinnamon
1/2 teaspoon nutmeg

1 2/3 cups sugar
2/3 cup canola oil
2 tablespoons molasses
1 cup canned pumpkin, or cooked pureed pumpkin
1 teaspoon vanilla
1 tablespoon ground flax seeds*

Directions
Preheat oven to 350.

Mix together flour, oats, baking soda, salt and spices.

In a seperate bowl, mix together sugar, oil, molasses, pumpkin and vanilla (and flax seeds if using) until very well combined. Add dry ingredients to wet, folding to combine.

Drop onto greased cookie sheets about a tablespoon at a time. They don't spread very much so they can be placed only an inch apart. Flatten the tops of the cookies with a fork or with your fingers, to press into cookie shape. Bake for 16 minutes at 350. If you are using two sheets of cookies on 2 levels of your oven, rotate the sheets halfway through for even baking. Makes about four dozen.

Remove from oven and let set before serving.

*Ground flax seed will add a chewy texture to the cookie, but is optional. I found the ground flax seed on the "health food" aisle, but I've also seen it with the flour.

**Variation: Fold in 1 cup walnuts (finely chopped) and 1/2 cup raisins right before dropping batter onto cookie sheet.

Thursday, September 23, 2010

Linguini with Pancetta and Parmesan


My friend Maria put this recipe on Facebook earlier this week. (I've tweaked it a little, but it's still basically the same recipe.) I was intrigued because I've seen capers in the grocery store, but have no clue what to do with them. So...I decided to try this recipe. Usually I don't even print up a recipe if I don't know what all the ingredients are because who wants to wonder around the commissary looking for an ingredient that you can't even pronounce. I got all the ingredients at the local commissary. (A commissary is military-ese for grocery store.)

3/4 package linguini
1 cup onion, chopped
a clove of garlic, pressed (or 1/2 teaspoon minced)
2/3 cup chopped pancetta (about 2 oz)*
1 (25.5-ounce) bottle of Muir Glen Organic Italian Herb pasta sauce**
1/4 c black olives, chopped
1 tablespoon capers (sold in a tall, skinny jar, usually located one or two shelves above the olives)
1/4 cup Parmesan cheese, shredded

*Pancetta is Italian bacon. I found it in the deli. The man working behind the counter told me it was cured and I didn't need to cook it, but I was suspicious. It looked raw to me. I googled it when I got home and it turns out that Pancetta is cured, like America bacon; however, like American Bacon it is RAW. It is sliced very thinly so it only needs to cook for a few minutes.

**(Actually any pasta sauce will probably work just fine, but this is what the recipe called for so that's what I used.)

Cook pasta according to package directions. While pasta cooks, heat a large nonstick skillet over medium-high heat. Coat pan with cooking spray. I'm a PAM girl. Add onion, pancetta, and garlic; sauté 5 minutes. Add pasta sauce; cook 5 minutes. Stir in olives and capers. Add pasta; toss well, and sprinkle with cheese.

This would probably be much better if I had remembered to buy a block of Parmesan, but we had to settle for the stuff in the green can.

Tuesday, September 21, 2010

Corn Bread


This is my mother's recipe for corn bread. I thought this was real corn bread my whole life, but when I was living in Georgia I had some of their corn bread and this is nothing like it. This corn bread is moist, sweet, and really yummy. It dissolves on your tongue. It's a little sweeter than traditional corn bread. I love it! Tonight I made it into a bread bowl and served the chili inside. Here's what you'll need:

2 1/2 c corn meal
1 c sugar
1 tsp salt
1/2 c flour
1/2 c butter
2 c milk
4 c water

Mix all the ingredients together in a large, heavy pan. I use my Dutch oven because I'm my mother's daughter. Cook over medium heat on the top of the stove until thick, stirring constantly. Put the mixture in the greased Edible Bowl muffin pan. (Or, if you don't feel like running out to Bass Pro Shop, you can grease a 9X13 baking dish). Bake at 400 degrees until it starts browning on top about 25-30 minutes.

If you use a regular baking dish, test your corn bread using the clean toothpick trick. The middle of the corn bread should be soft, but not mushy. This corn bread is even better when reheated in a microwave for breakfast the next morning.

Newest Gadget for the Kitchen


I found the coolest gadget at Bass Pro Shop a few weeks back. It's a muffin pan that makes Edible Bowls. You can use it to make shortbread bowls for Strawberry Shortcake, bread bowls for soups...even an ice bowl for Shrimp Cocktail. How cool is this? So I'm using it today to make my mother's corn bread for chili....

Monday, September 20, 2010

Dutch Oven Chicken


This is a pretty simple meal to throw together, but I love the flavor of the vegetables so much that I'm going to blog about it.

Chicken Thighs (4)
Potatos
Carrots
Onion
Garlic
Chicken Broth

Preheat your oven to 300 degrees. Heat a little olive oil over a med heat in the bottom of your Dutch oven. (You can use a cast iron skillet, too.) While the olive oil is heating, salt and pepper the chicken. Cook the chicken for about 7 minutes on each side. This will give the chicken a nice brown crust. (I pulled the skin off the chicken before photographing it because the skin just doesn't photograph well.) While the chicken is cooking cut up your vegetables into nice big chunks. I put the garlic through the garlic press because I think this makes the garlic flavor really pop. It has something to do with the press breaking up the garlic cell walls. Who knew biology was going to come in so handy in the kitchen? Toss the vegetables into the Dutch oven while the Dutch oven is still hot. Let'em cook for a few minutes, then add chicken broth. You want the broth to be about half way up the side of the chicken. Cover the Dutch oven and put it in the oven.

Now, go have a glass of wine, help your kids with their fractions, fold a few loads of laundry, watch Seinfeld, etc.

Let the chicken and vegetables slow roast for a few hours. The longer it roasts the softer and more wonderful it will all taste. Check it a few times and add more broth if needed, stir it around a little, and enjoy that garlicy aroma that is rolling out of the kitchen.

Serve with a good crusty bread...something you can use to really sop up that yummy goodness.

Confession: I also toss in any vegetable leftovers from the last night or so. You know, the green beans that you had one serving left and you put 'em in the fridge for tomorrow, but let's be honest, in a week you are probably going to throw them out anyway.

Monday, September 6, 2010

Avacado and Corn Salsa


2 ears of fresh corn,
1 tomato
1/4 red onion
3 avacados
juice of 2 limes
2-3 Tbsp fresh cilantro
salt and pepper to taste

Shuck the corn and cut the (uncooked) kernels off the cob. Dice tomato, red onion, and avacados. The orginal recipe called for 2 avacado, but lets be honest, I'm here for the avacado. I put three avacados in my salsa. The original recipe also called for 1 red jalapeno pepper, seeded and diced. But I started choking and gasping as soon as I sliced into the pepper. So I tossed it and skipped that step. Gently combine all ingredients in a bowl along with lime juice and cilantro. Salt and pepper to taste. Enjoy.

*Sometimes you make up the salsa before the party. To really bring out the flavor, save a lime. Squeeze the lime juice into the salsa and stir just before serving.